There are many ways to use the Excel integration in Mathcad to your advantage. Here’s one of my favorite use cases with the math software– and tips for setting it up.
Say I have a worksheet that performs some basic engineering calculations like the reactions, shear, and moment as well as the deflection of a simply supported beam subjected to a force. The cross section of the beam can be seen in the image below:

Cross section of a beam shown in Mathcad software.
If I were to update this worksheet manually with the dimensions of another cross section, I’d have to type in a few numbers, which takes time. But, I already have a database of numbers in Excel format. Why not just leverage the work that’s already done, and save as much time as possible?
This is where the Mathcad-Excel integration comes in. Once set up, I will be able to type a single ID value into the worksheet. Because it is connected to the related values in Excel, it will automatically update the rest.
There are a few ways you can get the data from the spreadsheet to PTC Mathcad, but in this example we’ll go with the Excel Component approach because I want my data displayed in a nice table.
Start by inserting an Excel component. Just follow these steps:
My table looks like this:
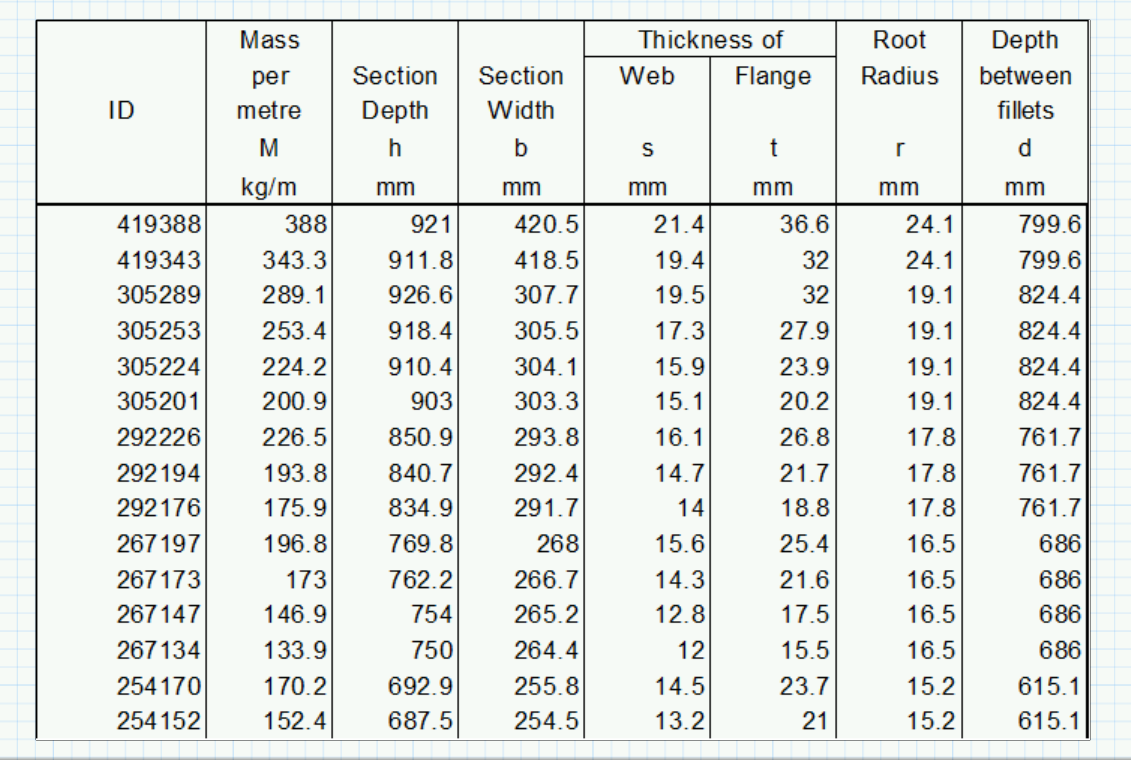
Worksheet showing Excel component in the math software
Now comes the interesting part. We need to connect the values from the table to the variables in the worksheet so it will automatically update the variables with the values that correspond to that ID.
To connect values, follow these steps:
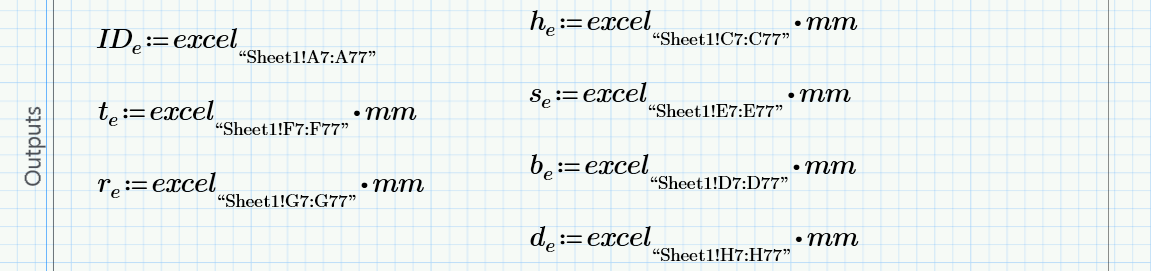
Assigning ranges of values to a variable
After you are done with defining the relations, hide them by collapsing the outputs area.
At this point if you evaluate any of the variables defined in there, you will get a vector of values. The thing is that we want the individual values corresponding to the ID, not the values for all of them. This brings us to our next and last step.

Using the match function
Using the “match” function, make sure the ID variable (marked in yellow) that you will enter manually in the worksheet is found in the IDe vector you pulled out of the Excel Component. This way you store the position of your ID in the variable idx. We then use the same idx variable to get the values on the same position as the ID from the he, be, se, te, de and re vectors. The returned values are assigned to the variables that are used in the Mathcad worksheet.
At this point, all you have to do is to enter the ID of the beam that you want to perform the calculations for and watch Mathcad update. Go on, give it a try.
Want to learn even more about using Mathcad? Check out this prerecorded webinar to learn more about documenting design intent, creating analysis-driven designs, and more.

Featured image Structure by Les Chatfield via Flickr